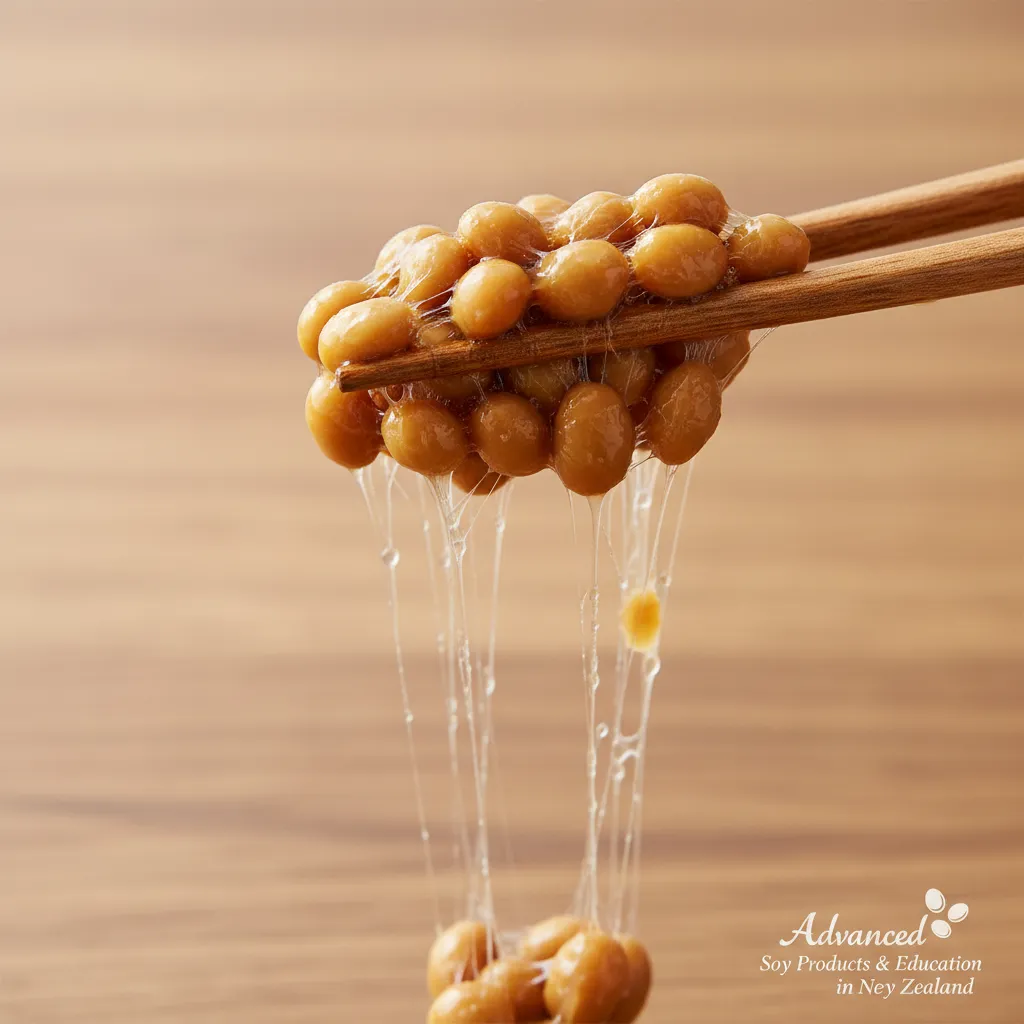
For the uninitiated, natto is a polarizing food. This traditional Japanese dish, made from fermented soybeans, is famous for its powerful smell, distinct nutty flavor, and incredibly sticky, stringy texture—often referred to as neba-neba. However, for those in the know, natto is a nutritional powerhouse, revered for its contribution to gut health and longevity.
In New Zealand, the interest in fermented foods has skyrocketed. From sourdough to kombucha, Kiwis are looking for ways to improve their microbiome. Yet, buying imported frozen natto from Asian supermarkets can be expensive and often involves excessive plastic packaging. Learning how to make natto NZ style allows you to control the quality of the soybeans, reduce waste, and ensure a fresh, active probiotic product.
This comprehensive guide will take you through the science, the sourcing, and the step-by-step process of mastering natto at home, specifically tailored for the New Zealand environment.
Understanding Natto: Japan’s Superfood in the Kiwi Kitchen
Natto is created by fermenting steamed soybeans with a specific bacterium called Bacillus subtilis var. natto. During fermentation, the bacteria break down the soy proteins and produce a sticky biofilm composed of polyglutamic acid. This biofilm is what gives natto its characteristic strings.
While the aroma can be likened to strong cheese or old socks by detractors, the flavor is deeply savory (umami) and complex. For the New Zealand palate, which is often accustomed to strong flavors like Marmite or aged cheddar, natto is not as distant a leap as one might assume.
The Health Benefits: Why New Zealanders Are Embracing Slime
The primary driver for learning how to make natto in NZ is health. It is considered one of the healthiest foods on the planet due to its unique nutritional profile.
- Vitamin K2 (Menaquinone-7): Natto is arguably the best natural source of Vitamin K2. This vitamin is crucial for directing calcium into the bones and keeping it out of the arteries, vital for heart health and bone density.
- Nattokinase: This is an enzyme produced during the fermentation process. Studies suggest nattokinase acts as a natural blood thinner and may help prevent blood clots, supporting cardiovascular health.
- Probiotics: Being a fermented food, natto is rich in probiotics that support a healthy gut microbiome, aiding digestion and boosting the immune system.
- High Quality Protein: It provides a complete plant-based protein source, making it excellent for vegetarians and vegans.
Expert Insight: “The bioavailability of soy is significantly increased through fermentation. The process reduces antinutrients like phytates, making the minerals in soybeans easier for your body to absorb.”
Sourcing Ingredients and Equipment in New Zealand
To successfully make natto, you need specific ingredients and tools. Sourcing these in New Zealand requires knowing where to look.
1. The Soybeans
The size of the bean matters. Traditionally, small soybeans are used because they ferment more evenly and offer a better surface-area-to-volume ratio for the bacteria to coat. In New Zealand, you have a few options:
- Asian Supermarkets (e.g., Japan Mart, Tai Ping): Look for dried soybeans. If you can find “small” or “pearl” soybeans, grab them.
- Bin Inn or Whole Food Stores: Many Bin Inn locations stock bulk organic soybeans. While these are often medium-sized, they work perfectly fine for homemade natto.
- Online Retailers: There are NZ-based online health food stores that sell non-GMO organic soybeans.
2. The Starter Culture (Spores)
You cannot make natto without the specific bacteria. You have two main routes:
- Commercial Spores: You can purchase pure Bacillus subtilis spores online (often imported). These are shelf-stable and potent.
- The “Back-Slop” Method: This is the easiest method for beginners in NZ. Buy a pack of high-quality frozen natto from a Japanese grocer. You will use a spoonful of this activated natto to inoculate your new batch of beans.
3. Equipment
- Pressure Cooker or Instant Pot: Essential for sterilizing tools and cooking beans thoroughly.
- Incubator: The bacteria thrive at 38°C to 42°C. In New Zealand’s often drafty homes, maintaining this temperature is the biggest challenge. You can use:
- A yogurt maker (check the temperature, as some run too hot).
- An Instant Pot with a “Yogurt” or “Sous Vide” function.
- A “Chilly Bin” (Cooler) method: Place the natto container in a cooler with a hot water bottle, changing the water regularly.
- An oven with just the light on (test the temp first).
- Glass Containers: Shallow, wide glass dishes work best to ensure oxygen flow.
- Cheesecloth or Kitchen Towel: To cover the beans while allowing them to breathe.
The Pros and Cons of DIY Natto
Before diving into the process, it is helpful to weigh the commitment required.
Pros
- Cost Effective: A 1kg bag of dried soybeans costs roughly $6–$8 NZD and yields nearly 2.5kg of natto. Imported natto costs $3–$5 for just 150g.
- Sustainability: Eliminates the Styrofoam and plastic packets used in commercial natto.
- Freshness: Freshly made natto has a superior, softer texture compared to frozen imports.
Cons
- Time Consuming: The process takes 24–48 hours total.
- Smell: Your kitchen will smell strongly of fermentation during the incubation period.
- Temperature Sensitivity: Requires monitoring; if the temperature drops, the fermentation stalls.
Step-by-Step Guide: How to Make Natto NZ Style
Follow this protocol strictly. Hygiene is paramount to prevent the growth of unwanted bacteria.

Step 1: Prep and Soak
Wash 500g of dried soybeans thoroughly. Place them in a large bowl and cover with 3 times the volume of water. Let them soak for 12 to 24 hours. The beans will triple in size. In colder NZ winter months, aim for the full 24 hours.
Step 2: Steam the Beans
Drain the soaked beans. Steam them until they are soft enough to be squashed easily between your thumb and ring finger.
Pressure Cooker Method: Steam for 40–50 minutes.
Stovetop Method: Simmer for 3–4 hours.
Note: Steaming is preferred over boiling to prevent the beans from becoming waterlogged.
Step 3: Sterilization
While the beans are cooking, sterilize your fermentation containers, spoon, and any cloth you will use. You can do this by boiling them or using the steam function on your pressure cooker. Contamination is the enemy of fermentation.
Step 4: Inoculation
Once the beans are cooked, drain any excess water. Transfer the beans to your sterilized container while they are still hot (around 80°C is fine for the transfer, but wait until they drop to roughly 45°C before adding the starter to avoid killing the bacteria).
Using Commercial Spores: Dissolve the special spoon amount (usually pinhead size) in 10ml of sterile warm water. Pour over beans.
Using Store-bought Natto: Mix 1 tablespoon of store-bought natto with a little warm sterile water to loosen the mucilage, then mix thoroughly into your cooked beans.
Stir well to ensure every bean is coated with the bacteria.
Step 5: Incubation
Spread the beans in the container so the layer is no more than 2-3cm deep. Natto bacteria are aerobic; they need oxygen to ferment.
Cover the container with a sterilized cheesecloth or paper towel and secure it with a rubber band. Do not use a tight lid.
Place in your incubator (yogurt maker, warm spot, etc.) and maintain a temperature of 38°C–42°C for 24 hours.
Step 6: The Cool Down (Aging)
After 24 hours, check the beans. You should see a white film coating them, and there should be a distinct ammonia/cheese smell. Stir the beans—if you see sticky strings, you have succeeded.
Remove from the incubator, cover with a lid, and place in the refrigerator. Do not eat yet. The flavor needs to mature, and the ammonia smell needs to dissipate. Age in the fridge for at least 24 to 48 hours before consuming.
Troubleshooting Common Fermentation Issues
Even experienced fermenters run into issues. Here is how to diagnose your batch.
| Problem | Likely Cause | Solution |
|---|---|---|
| Strong Ammonia Smell | Fermented too long or temperature too high (>45°C). | Reduce fermentation time. Age in fridge longer to dissipate smell. |
| No Sticky Strings | Temperature too low, insufficient oxygen, or weak starter. | Ensure temp stays above 38°C. Don’t stack beans too deep. |
| Beans are Dry/Hard | Undercooked beans or humidity too low during incubation. | Cook beans until very soft. Place a small cup of water in the incubator. |
| Sour/Off Smell | Contamination by unwanted bacteria. | Discard immediately. Improve sterilization next time. |
Serving Suggestions: Traditional and Modern Twists
Now that you have mastered how to make natto NZ style, how should you eat it? The texture can be challenging, but the right accompaniments make all the difference.
The Traditional Japanese Way
Place a serving of natto in a small bowl. Add a dash of soy sauce (shoyu) and a dab of karashi mustard. Mix vigorously with chopsticks until the mixture becomes frothy and pale. Pour over hot, steamed white rice and top with chopped spring onions.
The Kiwi Breakfast Twist
If rice for breakfast isn’t your preference, try natto on toast. Spread a thick layer of avocado on sourdough toast, top with your prepared natto (mixed with soy and mustard), and sprinkle with sesame seeds or furikake. The creaminess of the avocado bridges the texture of the beans perfectly.
Natto Omelet
Mix natto into your beaten eggs before frying. The heat reduces the sliminess slightly, and the nutty flavor pairs beautifully with egg and cheese.

Frequently Asked Questions
Can I freeze homemade natto?
Yes, absolutely. Natto freezes very well. Portion your finished, aged batch into small containers and freeze. It will last for several months. Thaw in the fridge overnight before eating.
Is the white coating on the beans safe?
Yes, the white coating is the biofilm produced by the bacteria. Sometimes you may also see small white spots which are amino acid crystals (tyrosine). These are safe and indicate a good fermentation, adding a crunchy texture.
Why is my natto bitter?
Bitterness usually indicates that the fermentation temperature was too high or it went on for too long. Stick to the 24-hour mark and ensure your incubator doesn’t exceed 42°C.
Can I use black soybeans?
Yes, you can make natto with black soybeans, chickpeas, or even adzuki beans. However, the fermentation times and textures may vary. Black soybean natto is considered a delicacy and is very nutritious.
Where can I buy natto spores in New Zealand?
Pure spores are hard to find in physical stores in NZ. Your best bet is ordering online from specialty fermentation websites (like Cultures for Health) or using the “back-slop” method by buying a pack of frozen natto from a local Asian supermarket like Japan Mart.
Mastering how to make natto NZ style is a rewarding journey into the world of fermentation. By controlling the ingredients and the process, you ensure a high-quality, sustainable superfood source right in your own kitchen. Happy fermenting!